
.png)
Problem
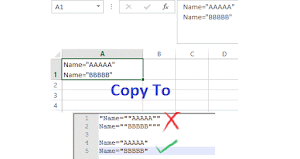
When I export a worksheet to CSV. If I have double quotes " in my cell value, it shows up correctly in Excel, but when I open the csv file in Notepad, the extra double quotes turn up. How to solve this issue?
Solution
If you want to export data to a CSV file from Excel and you have double quotes in your cell values, you can modify the code to handle this situation correctly. The issue you're describing is likely due to the way Excel escapes double quotes in CSV files. When a cell value contains double quotes, Excel encloses the entire cell value in double quotes and uses an additional double quote to escape any double quotes within the cell value. This is a common CSV format convention.
This problem can be solved by linking a visual basic script (Macros) the excel. I already write a post about similar issue. ( How to Avoid Extra Double Quotes When Copying From Excel ). You can refer that post if you find difficulty in implementing Macro.
I see that you want to export data to a CSV file without the extra double quotes that Excel adds when there are double quotes in cell values. To achieve this, you can modify the VBA code to export the data without the extra double quotes.
2. Open Visual Basic for Application by pressing Alt+F11. Alternatively, you can go to the "Developer" tab on the Excel ribbon (if you don't see the Developer tab, you can enable it in Excel options) and click "Visual Basic." This also opens the VBA editor.
3. From the left tab, you can select where you want to apply the VB script.
If you want to add script only on a single sheet of Excel, open the required sheet name. If you want this script in entire sheet, open ThisWorkbook
.png "VBA editor")
4. Paste following code in the opened window
Sub ExportSheetToCSVWithUserPrompt()
Dim MyFile As String
Dim SaveDialog As FileDialog
Dim rng As Range
Dim cellValue As String
Dim i As Integer, j As Integer
' Create a FileDialog object to prompt for file save location
Set SaveDialog = Application.FileDialog(msoFileDialogSaveAs)
' Prompt the user to choose a file name and path
If SaveDialog.Show = -1 Then
MyFile = SaveDialog.SelectedItems(1)
Else
Exit Sub ' User canceled, so exit the macro
End If
' Set the range to the entire used range of the active sheet
Set rng = ActiveSheet.UsedRange
' Open the CSV file for writing
Open MyFile For Output As #1
' Loop through each cell in the range and export to CSV
For i = 1 To rng.Rows.Count
For j = 1 To rng.Columns.Count
cellValue = rng.Cells(i, j).Value
If j < rng.Columns.Count Then
Print #1, cellValue & ",";
Else
Print #1, cellValue
End If
Next j
Next i
' Close the CSV file
Close #1
' Display a message indicating the export is complete
MsgBox "Data from the active sheet exported to CSV file: " & MyFile
End Sub
5. Save the VBA script

6. Now got View > Macros > View Macros

7. Select the saved Macros and click Options
Add a shortcut key for the Macro (for example, add Ctrl + q). Then close Macro
.png)
8. To run your VBA code: Press Ctrl+q for saving Excel To CSV without Extra Quotes.
If shortcut not added, In the Excel workbook, press ALT + F8 or go to the "View" tab, click "Macros," select your macro, and click "Run."
When you run the macro, it will prompt you to choose a file name and path where you want to save the CSV file. This gives you flexibility in specifying the location and name of the exported CSV file each time you run the macro.


.png&description=How To Remove Extra Quotes While Exporting Excel To CSV?)
0 Comments