
We Peel Onion For You | How I Solved It
Recent posts
.png) Windows
Windows
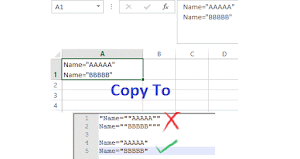
How To Remove Extra Quotes While Exporting Excel To CSV?
Problem When I export a worksheet to CSV. If I have double quotes " in my …
Read more Software
How to Fix MX Player Screen Orientation Issue
MX Player Screen Rotation Not Working I've been facing a peculiar issue wit…
Read more.jpg) Internet
Internet
Battle for Dominance: Google Launches Bard, its Competitor to OpenAI's ChatGPT
Google has reportedly been alarmed by the success of OpenAI's ChatGPT and i…
Read more Internet
AI Text Classifier - A Revolutionary Tool to Distinguish between Human-Written and AI-Generated Text
Artificial intelligence has been making waves in recent years, with AI-powered …
Read more Internet
Get Ahead of the Game with GPTZero: Tool to Detect ChatGPT Text
AI has been changing the world at a rapid pace, and the latest tool to enter th…
Read more.jpg) Website
Website
11 Things To Consider This Year While Keeping Your Blog Fresh
As we enter the new year, many bloggers are looking for fresh ideas and inspira…
Read more.jpg) Android
Android
How To Disable Your Call Is Being Recorded Announcement In Google Phone App During Call Recording?
I used Cubic call recorder for many. It works perfectly until the new android 1…
Read more Windows
How To Check If My Computer/ Laptop Compatible Windows 11 Using PC Health Check
There is an official tool from windows to check the compatibility of Windows 11…
Read more


Social Plugin